5 Easy Card Layouts (Sketches) Beginners Can Use Forever (With A2 Cut Sizes)
If you’re new to card making, the hardest part isn’t cutting paper or stamping—it’s staring at a blank card base and thinking… “Okay, now what?” That’s why card sketches (simple layouts) are a beginner’s best friend. Instead of designing from scratch every time, you follow a layout, swap the colors and theme, and suddenly you can create cards confidently—fast. In this post, I’m sharing 5 beginner-friendly card layouts you can use again and again, plus the exact cut sizes for an A2 card (the most common handmade card size). (Want a full supply list? Read: “Essentials for Beginner Card Makers” and come back here!)
1/19/20263 min read
What Is an A2 Card Size?
An A2 card measures 4.25" x 5.5" (folded).
Easy A2 card base cut:
Cut cardstock to 8.5" x 5.5"
Score at 4.25"
Fold = A2 card base
The Only “Rule” of Card Sketches
A sketch is just a layout guide. You can change:
colors
paper patterns
theme (birthday, thank you, holiday, baby, etc.)
focal image (stamp, die cut, sticker, printed image)
As long as you keep the general layout, it’ll still look polished.
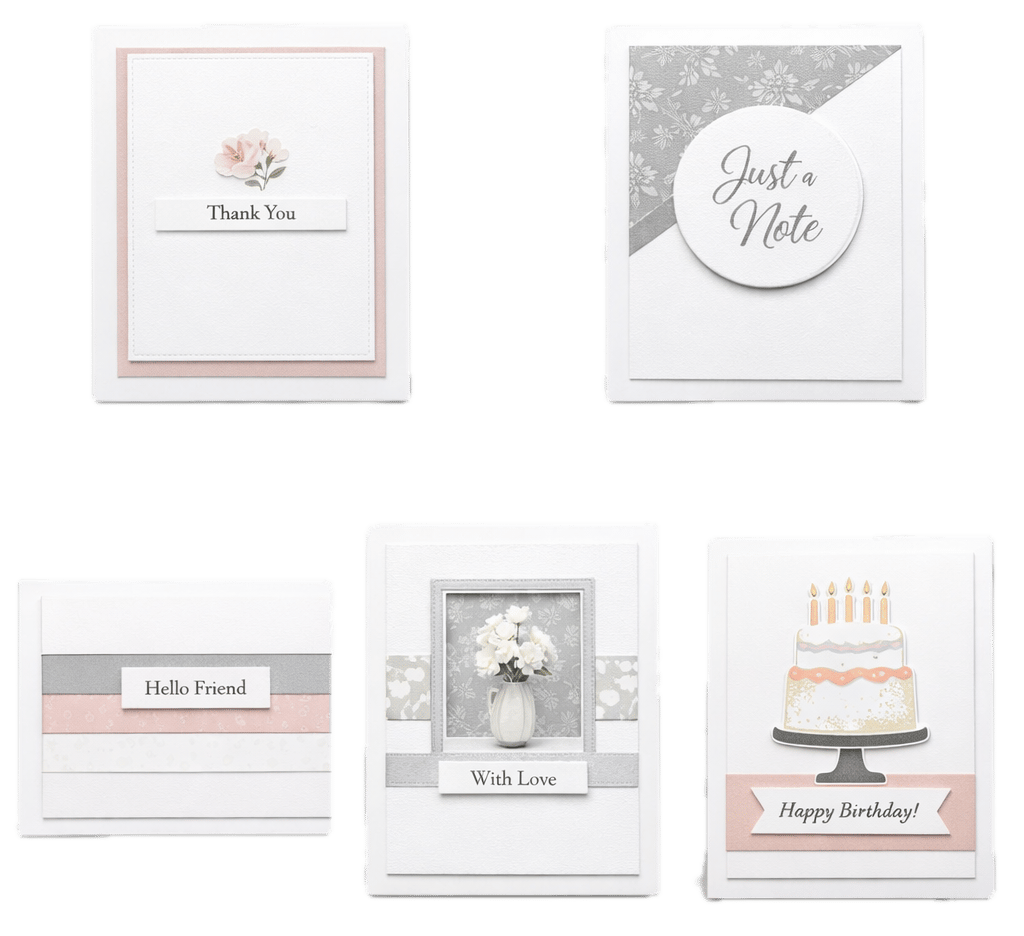
Sketch 1: The Classic Layered Panel (Beginner Favorite)
Look: clean, simple, always works.
Cut list (A2):
Background layer: 4" x 5.25"
Main panel: 3" x 4.25"
Sentiment strip: 0.75" x 3"
How to assemble:
Glue the 4" x 5.25" layer to your card base.
Add the 3" x 4.25" panel centered (or slightly higher than center).
Add a sentiment strip near the bottom of the main panel.
Optional: pop up the main panel with foam tape.
Quick variation ideas:
Use patterned paper for the background.
Use embossed cardstock for the main panel.
Add 3 enamel dots in one corner.
Sketch 2: Diagonal Designer Paper + Focal Circle
Look: fun, modern, super easy.
Cut list (A2):
Background layer: 4" x 5.25"
Patterned paper: 4" x 5.25" (cut diagonally corner to corner)
Circle focal: 2.25"–2.75" circle (or scallop circle)
Sentiment: small strip or stamped directly
How to assemble:
Cut patterned paper diagonally.
Glue one triangle onto the background layer (top or bottom).
Add a circle focal where the diagonal meets.
Add sentiment on the circle or right below it.
Quick variation ideas:
Swap the circle for a label shape.
Add a thin strip of cardstock along the diagonal like a “border.”
Sketch 3: Three Strips = Instant Design
Look: perfect for scraps, fast, beginner-proof.
Cut list (A2):
Background layer: 4" x 5.25"
Three strips: 1" x 4" (x3)
Small focal (optional): 2" circle or small die cut
Sentiment strip: 0.75" x 2.5"
How to assemble:
Attach background layer.
Place three strips across the card (horizontal or vertical).
Add sentiment over the strips (centered looks clean).
Optional: add a small focal above or beside sentiment.
Quick variation ideas:
Use different patterns in the same color family.
Add stitching details with a pen around each strip.
Sketch 4: Center Window Panel (Looks Fancy, Still Easy)
Look: layered and “pro” looking without extra skills.
Cut list (A2):
Background layer: 4" x 5.25"
Frame layer: 3.5" x 4.75"
Inner window (cut out): 2" x 3" (rectangle) or 2.25" circle
Inner backing piece: 3.25" x 4.5"
Sentiment: small strip or stamped on backing
How to assemble:
Cut a window shape out of the frame layer.
Glue the inner backing behind the window (patterned paper looks amazing here).
Attach to the background layer.
Add a small sentiment inside the window area.
Quick variation ideas:
Add vellum behind the window.
Use foam tape behind the frame for depth.
Sketch 5: Bottom Banner + Big Focal
Look: great for birthdays, holidays, and bold designs.
Cut list (A2):
Background layer: 4" x 5.25"
Bottom banner: 1.5" x 4" (or 2" x 4")
Focal piece: 2.5"–3" tall (die cut, stamp, sticker)
Sentiment: stamped strip
How to assemble:
Attach background layer.
Add banner near the bottom (cut a V-notch if you want).
Add large focal above the banner, slightly overlapping.
Add sentiment on the banner or just above it.
Quick variation ideas:
Add a second smaller banner behind the first.
Use glitter paper for the banner edge.
How to Turn These Sketches Into 10 Cards Fast (Batch Method)
If you want to build confidence quickly, try this:
Pick ONE sketch from above.
Cut supplies for 5 cards at once (same sizes).
Choose 2 color combos (so you don’t overthink).
Swap sentiments: Happy Birthday, Thank You, Thinking of You, Congrats, Hello.
You’ll learn faster and end up with a stack of cards ready to go.
Beginner Mistakes These Sketches Help You Avoid
Crowding the card (sketches give you spacing)
Random layering (you get structure)
Overusing embellishments (layout already looks finished)
Wasting patterned paper (measured cuts = fewer scraps)
Beginner FAQ
Do I need a die-cut machine for these?
Nope. These work with scissors + paper trimmer. If you do have dies, they just make it faster.
What adhesive should I use?
Tape runner for flat layers, liquid glue for tiny pieces, foam tape for dimension.
How do I make it look more “finished”?
Pick one: a thin border mat, 3 enamel dots, or foam tape. One small upgrade goes a long way.
This post may contain affiliate links, which means I may earn a small commission at no extra cost to you. I only recommend products I truly love and use.
Brand
Explore our sleek website template for seamless navigation.
Contact
Newsletter
kkraftingstudio@email.com
© 2026. All rights reserved.